In the final outcome of this project I will have to present on my blog three final photographs that show three different ways that I have experimented around with different lighting's. The way that I mean different lighting's, is that there are different categories when photographing with light, and if I didn't know about the categories, I wouldn't have such a professionally eye for my images and other images other photographers work that I have researched. I thought that it would be good to research different photographer's work because this would give me inspiration for my images that I would of been creating.
In our first lesson that we had for our project, my tutor was explaining some techniques on how to do different lighting.Two of the lighting techniques that my tutor had taught me was Hard and Soft Lighting.
Hard Lighting
Hard lighting is a technique that makes the object that is being photographed more vibrant and more eye opening to when viewing the image. Hard lighting mainly produces fine-lined shadows from a single light source, which is mainly the sun in most cases, because of the natural brightness, but can also be used in the studio photographing department. When trying to take a hard photographed image, you have to make sure that there is a lot of depth of field in the image is very strong and that the only thing that catches your eye is the object that is being photographed.
Good examples of photography that mostly uses hard lighting is shooting portraiture and a photographer who I can proudly show his great hard lighting techniques is Martin Schoeller. Schoeller is a New York based photographer who's style is distinguished by similar treatments of all subjects, whether they are celebrities or not. His most recognisable portraits are just head shots of some well known celebrities, such as Barrack Obama, Jay Z and Daniel Radcliffe. His work is easy to recognise because the way that all of his images have the same lighting, backdrop and tone to really make his portraits individual and detectable that they are his work. The great thing about Schoeller's work is that all his images shows off every person's imperfections so that they don't look whatsoever attractive, like they do on the television or in in magazines.
Here are a couple of examples of Martin Schoeller's portraits:
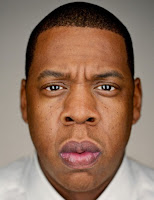 |
| Jay Z |
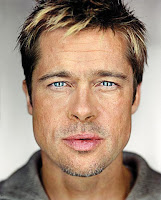 |
| Brad Pitt |
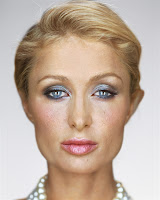 |
| Paris Hilton |
Soft lighting is a totally different style compared to hard lighting because instead of making the image look hard and crisp, like hard lighting does, it makes the image more warm and softer in colours and not so vibrant . The good things about soft lighting is that the warm soft light tends to curl comfortably around the object that is being positioned in front of the light and it seems to cast shadows with soft, not shark edges around the object. Another good thing is that the closer the light source is to the object, this is mainly in a studio room, the softer the light will be curling around that object. The last thing that is good about soft lighting is that soft light makes the object look more beautiful or younger. This makes the image look more pleasant to look at, due to the great skin texture and flawless tones on the object, and these sorts of images are good for modelling photographs a great picture to have in fashion magazines. Soft lighting can be as well taken outside for landscape photography, and all the light source is is the sun when the sun is setting and the warm colours of the sunset appear.
A great photographer who photographs soft light very well is Julia Margaret Cameron. Cameron is a British photographer who creates the most amazing soft lighting portraits that you would ever see. This is due to the amazing tone and texture that really shows up on the model's faces and bodies. She was most successful by capturing portraits by Charles Darwin and Robert Browning, but her most distinctive portraits are the ones where the portraits are cropped closely around the subject's face. The good thing about Cameron's portraits is that when she was taking the soft lighting portraits, she made the soft lighting different so that there was a varied amounts of portraits that were beautiful but photographed differently with different styles. I mean by this by all her portraits have different amounts of shadowing, because if there was a lot of shadowing on the person's face, that meant that the light was very close to the subject, but if there was hardly any shadowing, this meant that the light source was far away.
Here are a couple of examples of Julia Margaret Cameron's images:
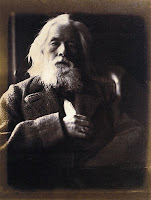 |
| Charles Hay Cameron (Husband) |
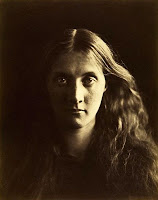 |
| Julia Prinsep Jackson (Cameron's niece) |
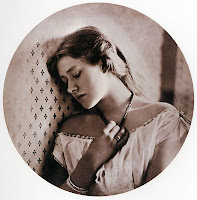 |
| "Sadness" |
My tutor also taught us some different ways of how to make an image look good over and under exposed, and these are called High and Low key lighting.
High Key and Low Key Lighting
High Key lighting is a style of lighting that makes the whole image look very over-exposed, this means by making the image brighter than normal so that hardly any shadow was presence during the capturing of the image. When viewing an High Key image, they give across mainly happiness and a calm soft feeling as if there wasn't a bad thing in the world. The great way that High Key lighting can be great inside of a studio and outside of a studio, is amazing because if you wanted to create such a high lighted image outside you would have to over-expose it. From over-exposing the image, you would have to change you settings by increasing the aperture another two F stops to make the image the right setting.
Low Key lighting is a style of lighting that makes the whole image look very under-exposed. This lighting technique is the complete opposite to High Key lighting, but all you have to do is under-expose the image by decreasing the aperture by two F stops. By under-exposing, this means that there hasn't been enough light entering the lens to capture enough light onto the image when being taken. When you view a Low Key image, it makes the viewer feel as if there is some gloomy mystery behind the image and this is because the majority of the image is dark. I think that Low key lighting is great for doing mysterious night photography and mysterious portraits that have a very strong meaning behind them.
Here is an example of each High and Low Key lightings:
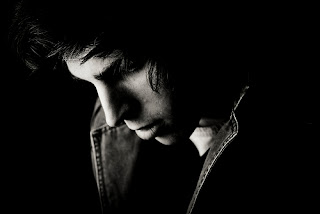 |
| Low Key Lighting |
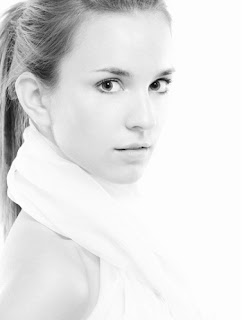 |
| High Key Lighting |
My last style of lighting that I got taught was the way in between High and Low Key, there is a lighting style which combines the both together to make an even lighted image and this style is called Mid Key.
Mid Key
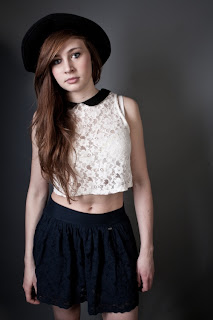
Mid Key is a lighting style that shows the in between stage of High and Low key. The way that I mean by that is by having the darkness and the brightness level and that makes the image more even. The best genre when taking pictures using a Mid Key lighting is by making sure that your image outcome is going to have a very strong meaning because there will be a lot of power in the image to back up the meaning. The feeling in a Mid Key image is that it will be in the middle of both High and Low key, so due to this the outcome will have to bring across a strong meaning that shows both sides. Mid Key can be used for both inside photography and outside photography because wherever you use it, it will always be suitable for absolutely any object.
Here is an example of a Mid Key Lighting image:

No comments:
Post a Comment